 |
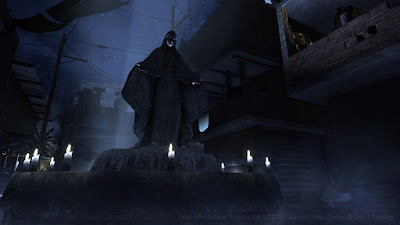
| Favela Courtyard in a rare night appearance |
Early in the development of FEAR 3, the art team was up against some significant challenges. Our engine was previously designed to service large scale outdoor games like Fracture and MechAssault. So we had to essentially retool "level design" to accomodate the relatively smaller-scale worlds we had in mind for our FPS.
Our first foray into 3D involved creating an "Art Test". By definition, an Art Test (sometimes also referred to as a beautiful corner) is designed to be a small snippet of a full 3d Environment. It demonstrates to the team and the publisher that that we have both the vision and the process to build the world art required to support 6-8 hours of single-player (and later co-op) campaign.
Now, in a perfect world, you would start this process with a very small team of skilled artists. That way, you can prove your concept with less risk and drain on resources. In our case, we had about 7 or 8 3D environment artists in two locations, plus myself focusing on the Art Test. With that many people, you go wide and try to cover a lot of territory quickly to help offset the burn rate of a larger team in pre-production.
We gave ourselves roughly a 60-day period to prototype two small Favela-style locations. And with the number of staff available, we were able to deliver playable prototypes that were fully set-dressed, at what we believed was alpha visual quality.*
*Note: Many many trials and lessons later we learned what "alpha visual quality" means in the real world. Stay tuned for more on this.
Level Art Beginnings
To start, we ran through some initial meetings with the Design team in order to understand more about the game play goals, story elements, and what role the environments would play. This was an important step, even though we weren't building a "real" level yet. Similar meetings with Engineering would cover engine metrics, art tools, and pipeline, helping give us a better understanding of our capabilities and limitations.
Then the Environment artists split into two mini-teams. Building on the great concept art and substantial reference imagery we assembled, one team focused on building the Favela Courtyard concept, and the other team started work on the Favela Alley concept.
For the artists, this is probably one of the most fun times on a project, because it's a true visual exploration and discovery of potential. The Art Test isn't encumbered by all the other factors that go into making a real game level, it's a unique expression of realtime 3D artwork.
Team Breakdown
Although there was always crossover, artists on the team were assigned roughly as follows:
Art Lead - manages the main World file and the placement of assets within, as well as integrating art created by the staff. This person is the gatekeeper of quality, consistency, and performance.
Hard Surface Modelers - a majority of the team, they build all the structures, objects, and props needed for the level. Often they would create the textures and build the necessary shaders.
Lighter - performs all duties required to light the world. This was usually myself in most of the early-to-mid FEAR 3 project work.
The Art Test is kind of like building a film set of your ideal game presentation. However, all assets must be built at realistic game resolutions. Our goal was to load and run comfortably on the XBox 360, so that one could closely inspect and interact with the world elements.
We combed through the concept & reference, producing lists of assets we wanted to make. Typically we'd categorize assets as "must-haves", "should-haves", and "nice-to-haves". This prioritization gave us a route to trim the lists without severely impacting the results (in case schedule became tight).
Results of the Art Tests
So here's what we came up with. The Chicago team at Day 1 Studios (led by Murray Kraft) built the Courtyard. We decided to represent the space as a more open, dense urban Favela with a late afternoon sun and hot, dusty, polluted air.
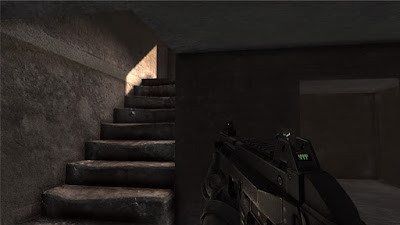
The Hunt Valley team at Day 1 Studios (led by Damien Bull) built the Alley. For that we wanted a more claustrophobic, close-quarters feeling with a mid-day sun and cooler color palette.
Here is some video captured from the Xbox 360 build:
And a few still images (wish I could have found more!):
As you can see we didn't try to build exactly 1:1 with the concept art. That sometimes can be cool, but in games it's often better to use concept art as a visual foundation. Not everything succesfully transferred from the concept art (mostly the richer, more saturated colors). But this was by design, as later we would need the characters to really pop in front of the backgrounds.
 |
| Favela Courtyard Art Test |
 |
| Favela Alley Art Test |
As you can see we didn't try to build exactly 1:1 with the concept art. That sometimes can be cool, but in games it's often better to use concept art as a visual foundation. Not everything succesfully transferred from the concept art (mostly the richer, more saturated colors). But this was by design, as later we would need the characters to really pop in front of the backgrounds.
It's worth noting that none of what I am showing would have been possible without the hard work of many people on the FEAR 3 team at Day 1 Studios. It takes an incredibly dedicated team of artists, designers, programmers, and production staff to make a project like this come together.
Our first attempt at scaling up
Naturally a huge environment of complex worlds can’t be built entirely from unique assets. Re-use, modularity, and tiling are all methods that extend game content while making production feasible within narrow time frames.
Favela is a challenging subject to systemize, given the chaotic and organic layout of the spaces. So in our first run at systemizing the environment, we broke the structures into separate interiors & exteriors, and tried to craft a lego-style system to piece it all together. Separately, we experimented with shaders that would take a base set of textures and produce lots of variation for little memory cost.
Favela shacks are relatively simple architecture, a haphazard stack of boxes is a reasonably good metaphor for how these neighborhoods were constructed. We started with looking at interiors & exteriors as separate entities.
1) A single but complex material for exterior and interior surfaces
2) Variants would be created for 1st, 2nd, and subsequent stories of a structure
3) Consistent UV scale that wraps perfectly around edges
4) Collision modeled at this level
Then we created the "uber" material, one that would provide a rich surface with plenty of variation.
1) Use Vertex alpha for blending layers (rough vs. cracked/degraded)
2) Use Vertex color for edge grime
3) One material and with an atlas texture at around 24 shader instructions
 |
| Vertex alpha blends between textures, vertex color adds explicit interest |
This approach gave us reasonably rich base surfaces which improved with geometric degradation applied. We could then layer on decal treatments to provide local detail. Structures would be built from a set of tiles that could mix & match exterior, interior, and multiple floors interchangeably
 |
| Early surface shader test of modular system |
So far this all looked good on the drawing board! We proceeded to build our first playable space using this modular approach. Following are some screenshots:
 |
| Building on hills adds that fun complexity factor |
 |
| Pretty cluttered view with weak path hinting, needs fixing! |
 |
| This room would later become a meth lab |
 |
| An early interior uncontaminated by props |
 |
| We started integrating some high rise slum architecture |
Hard lessons and Refinement
While our initial approach showed some promise, our modular construction system ended up being way more granular than we needed.
It was one of those sudden realizations that happens once all the pieces were on screen. Unfortunately, during normal game play the player moved through the environment so quickly that we had built way too much detail into the system.
It was not only too expensive to construct our worlds in terms of "per-minute of game play" cost, but the assets were too heavy in terms of performance when applied to larger level zones. This was primarily due to the mesh counts of all the pieces in the world.
Part of the solution was to find a way to slow down the player. But more importantly our system needed an overhaul. We would need to stop thinking of tiles as building sub-components or parts, and start thinking of them as entire buildings!
In addition to the above, we hadn't captured the essence of the Art Tests in this first level incarnation. Quite simply we had to get better at executing visually and systematically if we wanted any chance at building a full AAA game.
What's coming next:
Coming up in Part 3, I will detail how we modified our system approach, and scaled up again to hit both our visual and performance targets.


I love the feeling of the dusty late afternoon in these shots...
ReplyDeleteThanks Max!
ReplyDelete